To take screenshots of your FireTV device, you’ll need;
An Android smartphone with the Apps2Fire App installed orYou can use your Windows/Linux/Mac computer with ADB or Android Debug Bridge command line tool installed.
You can use a USB cable or WiFi network to connect your computer or android smartphone to Firestick. Too setup your FireTV Stick for taking screenshots, you must enable ADB Debugging which is found in the Developer options menu in the Settings. You can then issue commands to take screenshots of your FireTV using the ADB command line tool installed on your computer or you can use the Apps2Fire Smartphone App. If you want to connect to the FireTV via WiFi, you need to take note of your Firestick’s IP Address once it’s connected to your WiFi router. To do that, go to Settings > My Fire TV > About > Network. Now you are almost ready to take screenshots of your FireTV.
Using the Apps2Fire smartphone App
Alright, to take Screenshots of your Firestick using the Apps2Fire App;
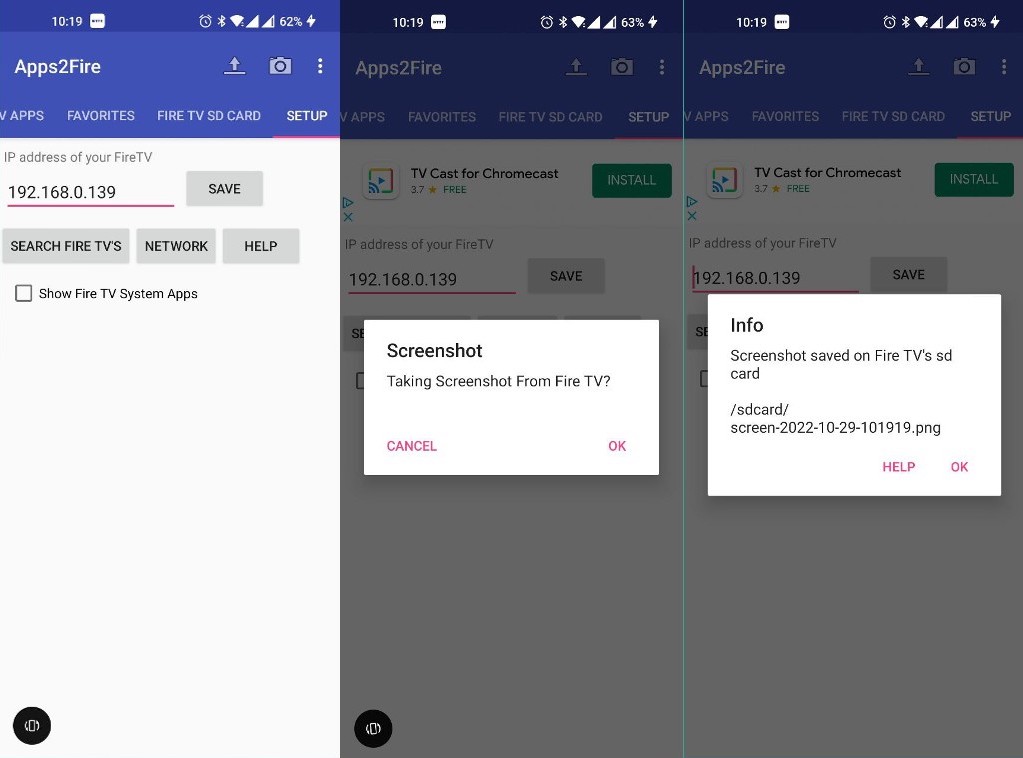
Download the Apps2Fire App from the Google Play store to your android phone. Select setup on the AppType in the IP address of your Firestick you noted down earlier in the only field on the screen and tap Save. You can also just tap on “Search Fire TV’s” which is easier. If your Phone and Firestick are connected to the same WiFi network, your Firestick will automatically be discovered. Select it and Connect to it. The App will tell if it has successfully connected to your FireTV. Now tap on the camera icon on the Apps2Fire App to take a Screenshot. If successful, the screenshot will be saved on the Fire TV’s SD card under the path /sdcard/screen-XXX.png. Take note of the screenshot’s file name and tap OK. Now Select the FireTV SD Card tab in the app and find your screenshot file by its name.Tap on the file and choose Download to download the screenshot to your phone.The screenshot is saved under /storage/emulated/0/Android/data/mobi.koni.appstorefiretv/files/Download. Use any file manager to navigate to the file location. I use the CX File Explorer App, to navigate to that location on my phone. That’s pretty much it.
Using ADB on your computer
You can connect to your Firestick from your computer via a USB cable or wirelessly over WiFi. You can then issue commands in the terminal to take screenshots of your Firestick. The images are saved on your Firestick and can be transferred to your computer. To get started, install ADB on your Mac/Linux or Windows PC. I won’t go through the actual installation process in this article, but there’s a comprehensive guide by xda-developers on how to set up ADB on these platforms. So the adb command for taking screenshots is; Change filename.png to the screenshot file name you want. Note that /sdcard is actually an emulated SD card. No physical SD card is required. This will start the screen recording in the background. If you wish to stop the screen cast, Press Ctrl+c to stop the recording. Transfer the screenshot from your Fire TV device to your computer using the following command: Change /tmp to the directory on your computer where you want to transfer the screenshot. So navigate to that folder to access the screenshot file. To delete the screenshot from the /sdcard location, use the rm (remove) command: